Installing a check valve may seem straightforward, but proper installation plays an important role in how the valve performs over time. Even when the correct valve has been selected, installation can influence flow performance, sealing, and overall service life.
At the same time, there is no single installation method that works for every application. Fluid type, operating pressure, tubing, equipment design, and manufacturing processes all vary from one system to the next. What works well in one application may not be appropriate in another.
Rather than providing one-size-fits-all instructions, this guide explains the general principles that help support reliable check valve performance across a wide range of industrial applications.
Why Installation Matters
A spring-loaded check valve is designed to allow flow in one direction while preventing reverse flow. When installed and operated under appropriate conditions, the valve opens when the inlet pressure reaches its specified opening pressure and closes as pressure decreases or reverse pressure develops.
Because the valve relies on its internal components to operate properly, installation can have a direct impact on performance.
Installation-related issues may contribute to:
- Reduced flow performance
- Leakage
- Inconsistent opening pressure
- Premature wear
- Shortened valve life
Not every valve problem is caused by installation, but it is often one of the first areas worth evaluating when troubleshooting system performance.
Before Installing a Check Valve
Every application has its own requirements, but there are a few basic considerations that are helpful before installation begins.
Confirm the Flow Direction
Perhaps the most important step is verifying the intended flow direction.
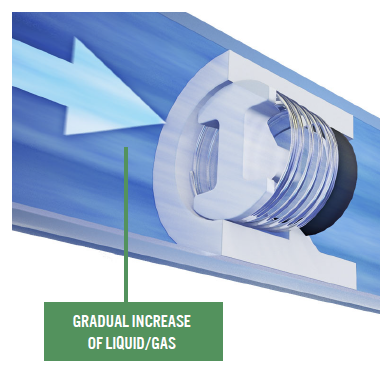
Most check valves include an arrow or other marking that indicates the designed flow path. Installing the valve backward prevents it from operating as it should and may completely block flow through the system.
Using a simple diagram illustrating flow direction can help verify the proper orientation before assembly.
Verify the Valve Matches the Application
Successful installation begins with selecting the appropriate valve.
Before installation, you should confirm that the valve is suitable for the:
- Operating pressure
- Expected flow rate
- Fluid compatibility
- Temperature range
- Required opening pressure
- Application environment
- Intended shelf life
A valve that is well matched to the application is more likely to deliver consistent performance throughout its service life.
Inspect the Valve Before Assembly
Before installation, it is also good practice to visually inspect the valve and surrounding components.
Look for obvious shipping damage, cracked fittings, or contamination that may have entered the packaging. Even small particles introduced before the valve is installed can affect sealing performance later.
Does Check Valve Installation Position Matter?
Another common question is whether a check valve should be installed horizontally, vertically, or in another orientation.
For many spring-loaded check valves, the answer depends less on gravity than many people expect.
Unlike swing check valves, which rely heavily on gravity and the weight of a hinged disc, spring-loaded check valves use an internal spring to control valve movement. The spring provides the force that keeps the valve closed until the inlet pressure reaches the valve’s specified opening pressure. As pressure increases or decreases, the balance between fluid pressure and spring force determines when the valve opens, closes, or holds a partially open position.
Because the spring controls most of the valve’s movement, many spring-loaded check valves can operate successfully in multiple orientations. However, installation position is still only one part of the equation.
Fluid properties, system pressure, tubing layout, available space, maintenance requirements, and the overall equipment design can all influence the installation position for a particular application.
Rather than asking whether one orientation is universally correct, it’s more helpful to ask which orientation best supports the requirements of the complete system.
Common Installation Mistakes That Can Affect Performance
The valve itself does not cause most installation-related issues. Instead, they result from assembly practices, contamination, or system conditions that interfere with normal operation.
Installing the Valve Against the Intended Flow Direction
A spring-loaded check valve is designed to allow fluid to move in one direction while preventing it from flowing back the other way. Inside the valve, inlet pressure pushes against the poppet. Once that pressure overcomes the spring force, the poppet lifts from its seat and allows flow to pass through the valve.
If the valve is installed backward, that sequence cannot happen. Instead of pushing the poppet away from the seat, the fluid pressure pushes the poppet into its seat. This can completely block flow or create pressure conditions that prevent the valve from operating properly.
Because of this, verifying the intended flow direction is one of the simplest ways you can avoid unnecessary performance issues.
Most check valves include a flow arrow or other marking that identifies the intended direction of flow. Taking a moment to confirm that orientation before assembly can help prevent troubleshooting later.
Damaging Internal Components During Assembly
Spring-loaded check valves contain precisely sized internal components that should be handled carefully during installation.
For example, excessive insertion force or improper assembly techniques may damage sealing components or displace internal parts. In some cases, a poppet can even be forced through the O-ring in the wrong direction, preventing the valve from sealing against reverse flow correctly.
The exact installation process will vary by application, but careful handling helps reduce the risk of unintended damage.
Assuming Every Application Uses the Same Installation Method
Industrial check valves are used in a wide variety of equipment, ranging from automated production systems to manually assembled products.
Some manufacturers use dedicated fixtures and highly controlled assembly processes, while others install valves during general equipment assembly. Because every manufacturing environment is different, installation methods often differ as well.
Rather than following one universal process, the goal is to install the valve in a way that supports the specific equipment, operating conditions, and manufacturing practices being used.
Installation Is Only One Part of Valve Performance
Even when a check valve is installed correctly, long-term performance depends on many additional factors.
These include:
- Fluid cleanliness
- Operating pressure
- Opening pressure selection
- Material compatibility
- Flow conditions
- Maintenance practices
Looking at the full system rather than the valve alone often leads to more effective troubleshooting and longer service life.
When Installation Problems Look Like Valve Failures
Some installation-related issues produce symptoms that appear to be valve failures.
For example:
|
If you observe… |
One possible cause could be… |
|
Little or no flow |
Incorrect flow direction or insufficient inlet pressure to reach the valve’s opening pressure |
|
Leakage |
Contamination or damaged sealing surfaces |
|
Inconsistent performance |
Debris, pressure fluctuations, or changing operating conditions |
|
Short service life |
Mechanical damage during installation or unfavorable system conditions |
General Guidelines for Reliable Installation
Although installation methods vary from one application to another, several principles apply across many industrial systems.
- Verify the intended flow direction before assembly.
- Select a valve appropriate for the operating conditions.
- Keep components clean during installation.
- Handle valves carefully to avoid damaging internal components.
- Consider the complete system when evaluating valve performance.
- Follow any application-specific equipment or manufacturer recommendations.
These practices cannot eliminate every installation-related issue, but they can help reduce the likelihood of avoidable problems.
Reliable Performance Starts with Proper Installation
Installing a check valve involves more than simply placing it into a fluid system. Proper orientation, clean assembly practices, careful handling, and appropriate valve selection all contribute to reliable long-term performance.
Because every application is different, installation should always be considered within the context of the complete system. Understanding the principles behind check valve operation—and recognizing how installation affects those principles—can help reduce performance issues and improve overall system reliability.